How to use dependency injection both manually and with a library like Swinject is valuable because it helps developers understand the core principles behind DI, such as decoupling and testability, before introducing them to more scalable, flexible solutions. By comparing both approaches, you empower readers to make informed architectural decisions based on project complexity and team needs. It appeals to a broad audience—from beginners learning the basics to experienced developers seeking to streamline their code using frameworks—and highlights the real-world tradeoffs between control and convenience, making it a practical and educational resource.
DIP-Dependency injection principle
Dependency injection is a software design principle in which an object or function receives the resources or dependencies it needs from external sources rather than creating them itself, promoting loose coupling and greater flexibility in code. By separating the responsibility of constructing dependencies from their usage, dependency injection makes programs easier to test, maintain, and modify, since dependencies can be swapped or mocked without changing the dependent code. This approach is closely related to the inversion of control principle, as it shifts the creation and management of dependencies to an external entity, often called an injector or container, allowing for more modular and configurable systems.
For our example the interface will be ‘UserService’:
protocol UserService {
    func fetchUsers() -> [User]
}

class DefaultUserService: UserService {
    func fetchUsers() -> [User] {
        return [
            User(id: 1, name: "Alice"),
            User(id: 2, name: "Bob")
        ]
    }
}
This is how View model uses the UserService interface:
class UserListViewModel: ObservableObject {
    @Published var users: [User] = []

    private let userService: UserService

    init(userService: UserService) {
        self.userService = userService
        loadUsers()
    }

    func loadUsers() {
        self.users = userService.fetchUsers()
    }
}
The view that presents user list:
struct UserListView: View {
    @ObservedObject var viewModel: UserListViewModel

    var body: some View {
        List(viewModel.users) { user in
            Text(user.name)
        }
    }
}
…but where is dependency injection implemented? You’re probably thinking that right now. Hold on a sec…
@main
struct ManualDIApp: App {
    var body: some Scene {
        WindowGroup {
            let userService = DefaultUserService()
            let viewModel = UserListViewModel(userService: userService)
            UserListView(viewModel: viewModel)
        }
    }
}
At that point in the code, an instance of DefaultUserService—which implements the UserService protocol—is being injected into the viewModel.
Dependency injection by using Swinject
Using a dependency injection library like Swinject becomes especially beneficial in larger or more complex iOS applications where managing dependencies manually can become tedious, error-prone, and hard to scale. Libraries automate the resolution and lifecycle of dependencies, support advanced features like scopes, circular dependencies, and conditional bindings, and reduce boilerplate code—making them ideal when your project has many services, view models, or interconnected modules. They also promote consistency and cleaner architecture across teams, especially in projects following patterns like MVVM or Clean Architecture, where dependency graphs can quickly grow intricate.
First thing to do is add ‘https://github.com/Swinject/Swinject’ as SPM package:
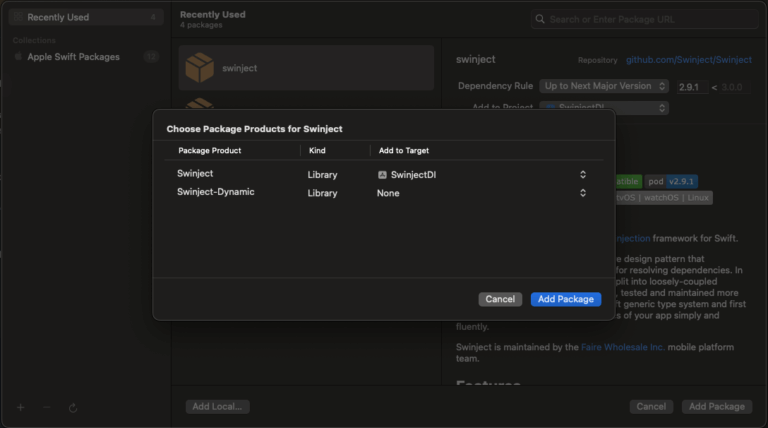
Look out! Add Swinject to SwinjectDI target, but Swinject-Dynamic to none. I faced compilations issues due to that.
Using a dependency injection library like Swinject becomes especially beneficial in larger or more complex iOS applications where managing dependencies manually can become tedious, error-prone, and hard to scale. Libraries automate the resolution and lifecycle of dependencies, support advanced features like scopes, circular dependencies, and conditional bindings, and reduce boilerplate code—making them ideal when your project has many services, view models, or interconnected modules. They also promote consistency and cleaner architecture across teams, especially in projects following patterns like MVVM or Clean Architecture, where dependency graphs can quickly grow intricate.
We have to declare a new component that will be responsible for resolving dependencies:
import Swinject

class DIContainer {
    static let shared = DIContainer()
    let container: Container

    private init() {
        container = Container()

        container.register(UserService.self) { _ in DefaultUserService() }
        container.register(UserListViewModel.self) { r in
            UserListViewModel(userService: r.resolve(UserService.self)!)
        }
    }
}
The code defines a singleton dependency injection container using the Swinject library to manage and resolve dependencies within an iOS application. The DIContainer class initializes a shared Container instance and registers two types: UserService, which is mapped to its concrete implementation DefaultUserService, and UserListViewModel, which depends on UserService and retrieves it from the container using resolution. By centralizing the creation of these objects, the code promotes loose coupling, testability, and maintainability, while Swinject handles the instantiation and dependency resolution automatically.
@main
struct SwinjectDIApp: App {
    var body: some Scene {
        WindowGroup {
            let viewModel = DIContainer.shared.container.resolve(UserListViewModel.self)!
            UserListView(viewModel: viewModel)
        }
    }
}
To implement dependency injection, we simply call the resolver to fetch the appropriate instance to be injected into UserListView. Notice that UserListViewModel also depends on UserService, but this dependency is also resolved by the DIResolver. In conclusion, we can observe that the lines of code required to construct the dependency stack have been reduced to a single line.
Handling different Protocol implementations
What we explained in the previous section covers most cases where dependency injection needs to be implemented. However, what happens when we have different protocol implementations? For example, consider a scenario where the same view is used in different application flows, but the data sources differ—one fetches data from a database, while the other uses a REST API.
class DefaultUserService: UserService {
    func fetchUsers() -> [User] {
        return [User(id: 1, name: "Alice")]
    }
}

class DefaultUserServiceV2: UserService {
    func fetchUsers() -> [User] {
        return [User(id: 2, name: "Charlie")]
    }
}
We now have two classes that implement the UserService protocol. The following changes are required to build the dependency injection stack:
            // Screen 1
            let service1 = DefaultUserService()
            let viewModel1 = UserListViewModel(userService: service1)

            // Screen 2
            let service2 = DefaultUserServiceV2()
            let viewModel2 = UserListViewModel(userService: service2)
View model is the same what it differs is the injected userService.
Dependency injection by using Swinject
The dependency injection stack usually consists of the same set of dependencies. This consistency is why third-party libraries like Swinject are beneficial—they take advantage of this common pattern.
However, occasionally, you may encounter a rare case in your app where the dependency stack for a particular screen needs to be set up differently—for instance, when the data source differs.
Here’s how the DIContainer resolves dependencies:
class DIContainer {
    static let shared = DIContainer()
    let container: Container

    private init() {
        container = Container()

        container.register(UserService.self, name: "v1") { _ in DefaultUserService() }
        container.register(UserService.self, name: "v2") { _ in DefaultUserServiceV2() }

        container.register(UserListViewModel.self, name: "v1") { r in
            let service = r.resolve(UserService.self, name: "v1")!
            return UserListViewModel(userService: service)
        }

        container.register(UserListViewModel.self, name: "v2") { r in
            let service = r.resolve(UserService.self, name: "v2")!
            return UserListViewModel(userService: service)
        }
    }
}
The solution was implemented by registering the instance type with a tag name. When implementing dependency injection, we need to provide an additional name tag parameter.
@main
struct SwinjectDIApp: App {
    var body: some Scene {
        WindowGroup {
            let viewModelV1 = DIContainer.shared.container.resolve(UserListViewModel.self, name: "v1")!
            UserListView(viewModel: viewModelV1)

//            let viewModelV2 = DIContainer.shared.container.resolve(UserListViewModel.self, name: "v2")!
//            UserListView(viewModel: viewModelV2)
        }
    }
}
In the previous code chunk, "v1" is hardcoded, but it should be dynamic. Ideally, it should instantiate either viewModelV1 or viewModelV2 depending on the situation.
Unit tests
Dependency injection in unit testing typically involves injecting a mock that implements a protocol, allowing for deterministic and controlled responses.
import Foundation
@testable import ManualDI

class DefaultUserServiceMock: UserService {
    func fetchUsers() -> [User] {
        return [
            User(id: 99, name: "Mocked User")
        ]
    }
}
Unit tests will look something like this:
import Testing
@testable import ManualDI

struct ManualDITests {

    @Test func example() async throws {
        // Write your test here and use APIs like `#expect(...)` to check expected conditions.
        let mock = DefaultUserServiceMock()
        let viewModel1 = UserListViewModel(userService: mock)

        #expect(viewModel1.users.count == 0)
    }

}
Dependency injection by using Swinject
Unit test will have to be implemented in following way:
import Testing
import Swinject
@testable import SwinjectDI

struct SwinjectDITests {

    @Test func example() async throws {
        // Write your test here and use APIs like `#expect(...)` to check expected conditions.
        let testContainer = Container()

        testContainer.register(UserService.self) { _ in DefaultUserServiceMock() }

         testContainer.register(UserListViewModel.self) { r in
             UserListViewModel(userService: r.resolve(UserService.self)!)
         }

         let viewModel = testContainer.resolve(UserListViewModel.self)!
        #expect(viewModel.users.first?.name == "Mocked User")
    }
}
Never use the app-wide DIContainer.shared in tests — always use a local test container so you can inject mocks safely and independently.
@Injected properly wrapper
One more thing… By using following property wrapper:
import Swinject

@propertyWrapper
struct Injected<T> {
    private var service: T

    init(name: String? = nil) {
        if let name = name {
            self.service = DIContainer.shared.container.resolve(T.self, name: name)!
        } else {
            self.service = DIContainer.shared.container.resolve(T.self)!
        }
    }

    var wrappedValue: T {
        service
    }
}
DIContiner keeps more simplified:
class DIContainer {
    static let shared = DIContainer()
    let container: Container

    private init() {
        container = Container()

        container.register(UserService.self, name: "v1") { _ in DefaultUserService() }
        container.register(UserService.self, name: "v2") { _ in DefaultUserServiceV2() }

        container.register(UserListViewModel.self, name: "v1") { _ in UserListViewModel() }
        container.register(UserListViewModel.self, name: "v2") { _ in UserListViewModel() }
    }
}
And also viewmodel:
 class UserListViewModel: ObservableObject {
     @Published var users: [User] = []

     @Injected(name: "v1") private var userService: UserService

     func loadUsers() {
         self.users = userService.fetchUsers()
     }
 }
Conclusions
I did not try to convince you how useful Dependency Injection is; you can easily find information about it on the internet. Instead, I aim to show how, with a third-party library like Swinject, the process of setting up the Dependency Injection stack can be simplified.
You can find source code used for writing this post in following repository.
References
- S.O.L.I.D Principles in Swift
JaviOS Post
- Swinject
GitHub repository