The aim of this post is to bridge the gap between web technologies and native iOS development by enabling data transfer from the web side to the app. In some native apps, it is common to have a WebView control rendering web content, and it is not unusual for the app to require data from the web content for further tasks.
In this post, we simulate a local web server using a Docker container running an HTML+JavaScript page that displays a button. When the button is pressed, a message is sent and captured by the app.
Web content and web server
<!DOCTYPE html>
<html lang="en">
<head>
    <meta charset="UTF-8">
    <meta name="viewport" content="width=device-width, initial-scale=1.0">
    <title>Communication with SwiftUI</title>
</head>
<body>
    <h1>Hello world!</h1>
    <p>This is a HTML page served from a Docker container with Nginx.</p>
    <button id="sendDataBtn">Send Data to App</button>

    <script>
        document.getElementById("sendDataBtn").addEventListener("click", function() {
            var data = "Hello from JavaScript!";
            // Send data to the native app
            window.webkit.messageHandlers.callbackHandler.postMessage(data);
        });
    </script>
</body>
</html>
When the button is pressed, a message such as “Hello from JavaScript!” or any custom text of your choice is sent to the app.
To serve this page, I have chosen Docker. Docker is an open-source platform that allows developers to automate the deployment, scaling, and management of applications within lightweight, portable containers. Containers encapsulate an application and its dependencies, ensuring consistent behavior across different environments, from development to production.
By providing an isolated and reproducible environment, Docker resolves the classic “it works on my machine” issue. It enhances development efficiency, simplifies deployment processes, and streamlines testing, making it easier to scale and maintain applications across various systems or cloud infrastructures.
Docker is a fascinating topic! If you’re unfamiliar with it, I highly recommend exploring some tutorials. At the end of this post, I’ve included a list of helpful references.
Below is the Dockerfile we created to build the Docker image:
# Nginx base image
FROM nginx:alpine

# Copy HTML file into container
COPY index.html /usr/share/nginx/html/index.html

# Expose port 80 (defect port for Nginx)
EXPOSE 80
This Dockerfile creates a Docker image that serves an HTML file using Nginx on a lightweight Alpine Linux base. Here’s a breakdown of each line:
FROM nginx:alpine:
This line specifies the base image to use for the Docker container. It uses the officialnginximage with thealpinevariant, which is a minimal version of Nginx built on the Alpine Linux distribution. This results in a small and efficient image for running Nginx.COPY index.html /usr/share/nginx/html/index.html:
This line copies theindex.htmlfile from your local directory (where the Dockerfile is located) into the container’s filesystem. Specifically, it places theindex.htmlfile into the directory where Nginx serves its static files (/usr/share/nginx/html/). This file will be accessible when the container runs, and Nginx will serve it as the default webpage.EXPOSE 80:
This instruction tells Docker that the container will listen on port 80, which is the default port for HTTP traffic. It doesn’t actually publish the port but serves as documentation for which port the container expects to use when run. This is helpful for networking and linking with other containers or exposing the container’s services to the host machine.
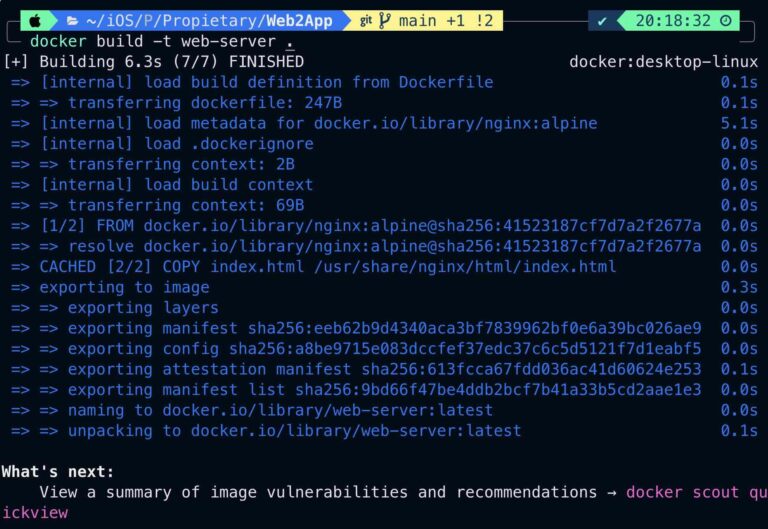
To create the Docker image, open a terminal window in the directory containing the Dockerfile and run:
$ docker build -t web-server . The command docker build -t web-server . builds a Docker image from the Dockerfile in the current directory (.). The resulting image is tagged with the name web-server.
The next step is to run the container. In the context of programming, a container can be likened to creating an instance of an object.
$ docker run -d -p 8080:80 web-server The command runs a Docker container in detached mode (-d) using the image web-server. It maps port 8080 on the host machine to port 80 inside the container (-p 8080:80)


The iOS app
iOS App basically presents a WebView controller:
struct ContentView: View {
    @State private var messageFromJS: String = ""
    @State private var showAlert = false

    var body: some View {
        VStack {

            WebView(url: URL(string: "http://localhost:8080/")!) { message in
                messageFromJS = message
            }
            .frame(maxWidth: .infinity, maxHeight: .infinity)
        }
        .onChange(of: messageFromJS) {
            showAlert.toggle()
        }
        .alert(isPresented: $showAlert) {
            Alert(
                title: Text("Message from JavaScript:"),
                message: Text("\(messageFromJS)"),
                dismissButton: .default(Text("OK"))
            )
        }
    }
}
If we take a look at WebView:
import SwiftUI
import WebKit

struct WebView: UIViewRepresentable {
    var url: URL
    var onMessageReceived: (String) -> Void // Closure to handle messages from JS

    class Coordinator: NSObject, WKScriptMessageHandler {
        var parent: WebView

        init(parent: WebView) {
            self.parent = parent
        }

        // This method is called when JS sends a message to native code
        func userContentController(_ userContentController: WKUserContentController, didReceive message: WKScriptMessage) {
            if message.name == "callbackHandler" {
                if let messageBody = message.body as? String {
                    parent.onMessageReceived(messageBody)
                }
            }
        }
    }

    func makeCoordinator() -> Coordinator {
        return Coordinator(parent: self)
    }

    func makeUIView(context: Context) -> WKWebView {
        let configuration = WKWebViewConfiguration()
        configuration.userContentController.add(context.coordinator, name: "callbackHandler")

        let webView = WKWebView(frame: .zero, configuration: configuration)
        webView.load(URLRequest(url: url))
        return webView
    }

    func updateUIView(_ uiView: WKWebView, context: Context) {
        // No need to update the WebView in this case
    }
}
The code defines a WebView struct that integrates a WKWebView (a web view) into a SwiftUI interface. The WebView struct conforms to the UIViewRepresentable protocol, allowing it to present UIKit components within SwiftUI. A custom coordinator class (Coordinator) is set up to handle messages sent from JavaScript running inside the web view. Specifically, when JavaScript sends a message using the name "callbackHandler", the userContentController(_:didReceive:) method is triggered. This method passes the message to a closure (onMessageReceived) provided by the WebView, enabling custom handling of the message.
The makeUIView method creates and configures the WKWebView, including loading a specified URL to display the desired web content. When the project is deployed in a simulator, the web content is rendered properly, demonstrating the effectiveness of this integration.
This implementation provides a powerful way to integrate web content into a SwiftUI application, enabling dynamic interaction between SwiftUI and JavaScript.
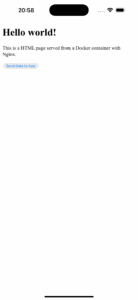
When we press the ‘Send Data to App’ button:

Is presented an alert with the message sent from web content.
Conclusions
In this post, I have preseted a way to pass information from web to iOS App. In this app we have transfered non-sensitive information because passing information from web content in a WebView to an iOS app poses several security risks, including Cross-Site Scripting (XSS) attacks, data leakage, injection attacks, unauthorized file system access, URL scheme abuse, and mixed content issues. These vulnerabilities can lead to unauthorized access to user data, compromise of app integrity, and exposure of sensitive information. To mitigate these risks, developers should use WKWebView, implement input sanitization, enforce content security policies, use HTTPS, disable unnecessary JavaScript execution, and properly configure WebView restrictions. By adhering to these security practices, developers can significantly reduce the attack surface and enhance the overall security of their iOS applications.
You can find source code used for writing this post in following repository.
References
- Ultimate Docker: guía de cero hasta despliegues
Udemy Course
- WKWebView
Apple Developer Documentation