Using GraphQL instead of REST offers greater flexibility and efficiency. It allows clients to request precisely the data they need through a single endpoint, avoiding issues like over-fetching or under-fetching. Its strongly-typed schema enhances the developer experience by providing built-in documentation and easy introspection. Additionally, GraphQL’s real-time capabilities, enabled through subscriptions, support features such as live updates. It also excels at aggregating data from multiple sources into a unified API, making it an excellent choice for complex systems. However, it can introduce added server-side complexity and may not be necessary for simple or static applications where REST is sufficient.
In this post, we will create a minimal, dockerized GraphQL server and implement an iOS client app that performs a request. At the end of the post, you will find a link to a GitHub repository containing the source code for further review.
Setup a graphQL Server
In this section, we will develop a minimal GraphQL dockerized server. The purpose of this post is not to dive deeply into GraphQL or Docker. However, I recommend spending some time exploring tutorials on these topics. At the end of the post, you will find links to the tutorials I followed.
The server code fetches data from hardcoded sources for simplicity. In a typical scenario, the data would be retrieved from a database or other data source:
import { ApolloServer, gql } from 'apollo-server';

// Sample data
const users = [
    { id: '1', name: 'Brandon Flowers', email: 'brandon.flowers@example.com' },
    { id: '2', name: 'Dave Keuning', email: 'dave.keuning@example.com' },
    { id: '3', name: 'Ronnie Vannucci Jr.', email: 'ronnie.vannuccijr@example.com' },
    { id: '4', name: 'Mark Stoermer', email: 'mark.stoermer@example.com' },
  ];

// Schema
const typeDefs = gql`
  type Query {
    getUser(id: ID!): User
  }

  type User {
    id: ID!
    name: String!
    email: String!
  }
`;

// Resolver
const resolvers = {
  Query: {
    getUser: (_, { id }) => {
      const user =  users.find(user => user.id === id);
      if (!user) {
        throw new Error(`User with ID ${id} not found`);
      }
      return user;
    },
  },
};

// Setup server
const server = new ApolloServer({ typeDefs, resolvers });

// Start up server
server.listen().then(({ url }) => {
  console.log(`🚀 Servidor listo en ${url}`);
}); # Usamos una imagen oficial de Node.js
FROM node:18
# Establecemos el directorio de trabajo
WORKDIR /usr/src/app
# Copiamos los archivos del proyecto a la imagen
COPY . .
# Instalamos las dependencias del proyecto
RUN npm install
# Exponemos el puerto 4000
EXPOSE 4000
# Ejecutamos el servidor
CMD ["node", "server.js"] This Dockerfile packages a Node.js application into a container. When the container is run, it performs the following actions:
- Sets up the application directory.
- Installs the required dependencies.
- Starts the Node.js server located in
server.js, making the application accessible on port 4000.
To build the Docker image, use the following command:
docker build -t graphql-server . 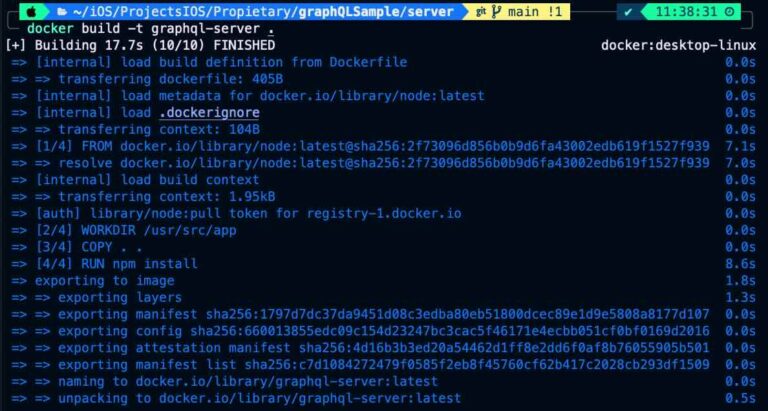
docker run -p 4000:4000 graphql-server 
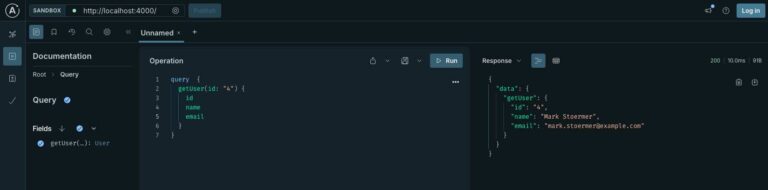
query  {
  getUser(id: "4") {
    id
    name
    email
  }
} 
Sample iOS graphQL client app
For the sample iOS GraphQL client app, we will follow the MVVM architecture. The app will use Swift 6 and have Strict Concurrency Checking enabled. The app’s usage is as follows:
The user enters an ID (from 1 to 4), and the app prompts for the user’s name. The server then responds with the name associated with that ID. I will skip the view and view model components, as there is nothing new to discuss there. However, if you’re interested, you can find a link to the GitHub repository.
The key aspect of the implementation lies in the GraphQLManager, which is responsible for fetching GraphQL data. Instead of using a GraphQL SPM component like Apollo-iOS, I chose to implement the data fetching using URLSession. This decision was made to avoid introducing a third-party dependency. At this level, the code remains simple, and I will not expand further on this in the post.
Regarding Swift 6 compliance, the code is executed within a @GlobalActor to avoid overloading the @MainActor.
import SwiftUI
import Foundation

@globalActor
actor GlobalManager {
    static var shared = GlobalManager()
}

@GlobalManager
protocol GraphQLManagerProtocol {
    func fetchData(userId: String) async -> (Result<User, Error>)
}

@GlobalManager
class GraphQLManager: ObservableObject {

    @MainActor
    static let shared = GraphQLManager()

}

extension GraphQLManager: GraphQLManagerProtocol {

    func fetchData(userId: String) async -> (Result<User, Error>) {

        let url = URL(string: "http://localhost:4000/")!
        let query = """
        query  {
          getUser(id: "\(userId)") {
            id
            name
          }
        }
        """

        let body: [String: Any] = [
            "query": query
        ]
        guard let jsonData = try? JSONSerialization.data(withJSONObject: body) else {
            return .failure(NSError(domain: "Invalid JSON", code: 400, userInfo: nil))
        }

        var request = URLRequest(url: url)
        request.httpMethod = "POST"
        request.addValue("application/json", forHTTPHeaderField: "Content-Type")
        request.httpBody = jsonData

        do {
            let (data, response) = try await URLSession.shared.data(for: request)
            guard let httpResponse = response as? HTTPURLResponse,
                (200...299).contains(httpResponse.statusCode) else {
                return .failure(ErrorService.invalidHTTPResponse)
            }
            do {
                let graphQLResponse = try JSONDecoder().decode(GraphQLResponse<GraphQLQuery>.self, from: data)
                return .success(graphQLResponse.data.user)
            } catch {
                return .failure(ErrorService.failedOnParsingJSON)
            }
        } catch {
            return .failure(ErrorService.errorResponse(error))
        }
    }

}
Conclusions
GraphQL is another alternative for implementing client-server requests. It does not differ significantly from the REST approach. You can find source code used for writing this post in following repository.
References
- GraphQL
Official site
- GraphQL by Example
Udemy training
- Ultimate Docker: guía de cero hasta despliegues
Udemy training