Having good practices is one of the key points for successfully steering your project to completion, especially when working as part of a team. In this post, I will explain how to implement these tasks in a CI/CD environment such as GitHub.
First, we will set up essential tasks like unit testing and linting locally, and then apply these tasks as requirements for integration approvals.
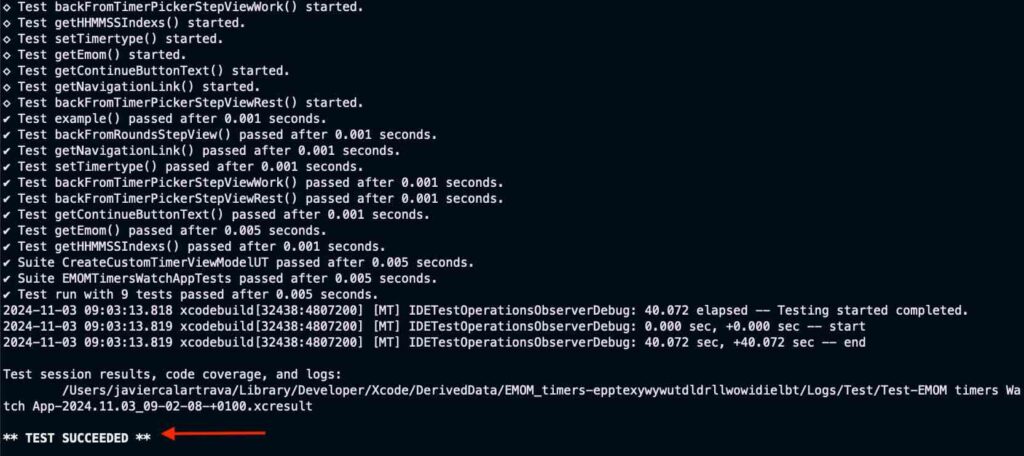
Executing unit test through command line console
At this point, we assume that the unit test target is properly configured in your project. This section is important because we will need to use the command in the future.”

xcodebuild is a command-line tool provided by Apple as part of Xcode, it allows developers to build and manage Xcode projects and workspaces from the terminal, providing flexibility for automating tasks, running continuous integration (CI) pipelines, and scripting.
Simply execute the command to validate that everything is working correctly.
Linting your code
Linting your code not only improves quality, prevents errors, and increases efficiency, but it also facilitates team collaboration by reducing time spent on code reviews. Additionally, linting tools can be integrated into CI pipelines to ensure that checks are part of the build and deployment process.
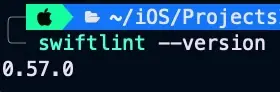
The tool we will use for linting is SwiftLint. Here, you will find information on how to install it on your system. Once it is properly installed on your system:
Go to project root folder and create file .swiftlint.yml, this is default configuration, you can check following link to know more about the defined rules.
disabled_rules:
- trailing_whitespace
opt_in_rules:
- empty_count
- empty_string
excluded:
- Carthage
- Pods
- SwiftLint/Common/3rdPartyLib
line_length:
    warning: 150
    error: 200
    ignores_function_declarations: true
    ignores_comments: true
    ignores_urls: true
function_body_length:
    warning: 300
    error: 500
function_parameter_count:
    warning: 6
    error: 8
type_body_length:
    warning: 300
    error: 500
file_length:
    warning: 1000
    error: 1500
    ignore_comment_only_lines: true
cyclomatic_complexity:
    warning: 15
    error: 25
reporter: "xcode"
Now, let’s integrate this in Xcode. Select your target, go to Build Phases, click the plus (+) button, and choose ‘New Run Script Phase’.
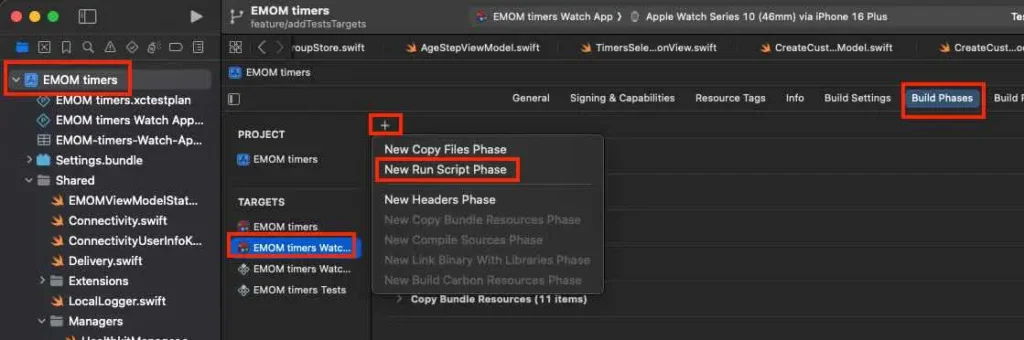
Rename the script name to ‘swiftlint’ for readability, and make sure to uncheck ‘Based on…’ and ‘Show environment…’.
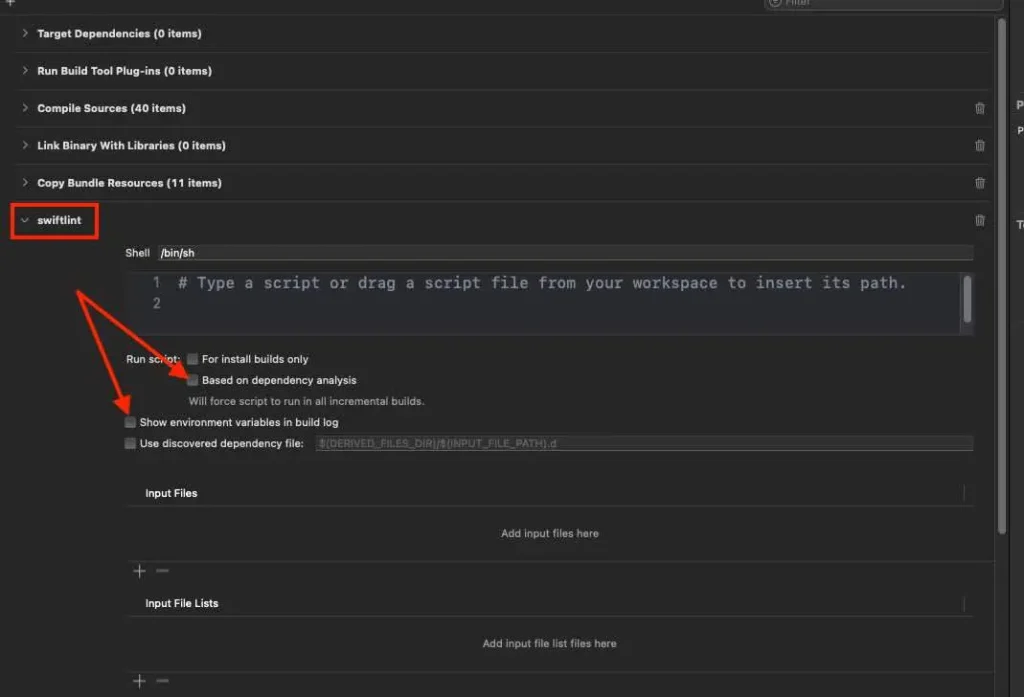
Paste the following script.
echo ">>>>>>>>>>>>>>>>>>>>>>>> SWIFTLINT (BEGIN) >>>>>>>>>>>>>>>>>>>>>>>>>>>>>>"
if [[ "$(uname -m)" == arm64 ]]; then
    export PATH="/opt/homebrew/bin:$PATH"
fi

if which swiftlint > /dev/null; then
  swiftlint
else
  echo "warning: SwiftLint not installed, download from https://github.com/realm/SwiftLint"
fi
echo "<<<<<<<<<<<<<<<<<<<<<<<<< SWIFTLINT (END) <<<<<<<<<<<<<<<<<<<<<<<<<<<<<<<<" 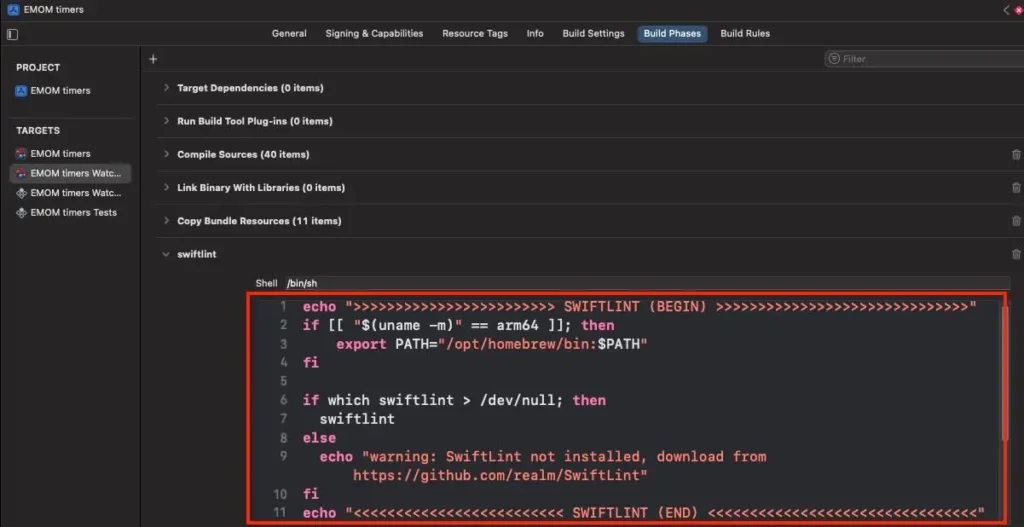
Select the target and build (Cmd+B). If you review the build log, you will see a new warnings triggered.

GitHub actions
GitHub Actions is a powerful CI/CD platform integrated within GitHub, allowing developers to automate, customize, and streamline their software workflows directly from their repositories. It uses YAML configuration files to define tasks or workflows that run in response to events, such as pushing code, opening pull requests, or setting schedules. With its flexibility, developers can automate building, testing or deploying applications.
Workflow for executing unit test
At this point, we assume that we are in the root folder of a repository cloned from GitHub. Navigate to (or create) the following folder: ./github/workflows. In that folder, we will place our first GitHub Action for executing the unit tests. In my case, it was a file called UTest.yml with the following content:
name: utests-workflow

on:
  pull_request:
    branches: [main, develop]
jobs:
  utests-job:
    runs-on: macos-latest

    steps:
      - name: Check out the repository
        uses: actions/checkout@v4

      - name: Set to XCode 16.0
        uses: maxim-lobanov/setup-xcode@v1
        with:
           xcode-version: '16.0'

      - name: Execute Unit tessts (iOS target)
        run: xcodebuild test -scheme 'EMOM timers' -destination 'platform=iOS Simulator,name=iPhone 16,OS=latest'

      - name: Execute Unit tessts (AW target)
        run: xcodebuild test -scheme 'EMOM timers Watch App' -destination 'platform=watchOS Simulator,name=Apple Watch Series 10 (42mm),OS=latest'
The first tag is name, which contains the given name for the workflow. Next, the on tag defines which event can trigger the workflow to run. In this case, we are interested in executing the workflow when a pull request targets the main or develop branch (for available events, please review the documentation).
Finally, we find the jobs section, which describes the tasks we want to execute. utest-job is the designated name for this job, and the environment where it will be executed is specified as macos-latest.
Next, we find the steps, which outline the sequence of actions to be executed. The first step is to check out the repository. In this step, we specify a shell command, but instead, we see an action being referenced. An action is a piece of code created by the community to perform specific tasks. It is highly likely that someone has already written the action you need, so be sure to review GitHub Actions or GitHub Actions Marketplace. The checkout action was defined in the GitHub Actions repositoty, and we can see that its popularity is good, so let’s give it a try.
The second step is to set the Xcode version to one that is compatible with your project. My project is currently working with Xcode 16.0, so we need to set it to that version. I found this action in the GitHub Action marketplace.
The final two steps involve executing unit tests for each target. Now, we can commit and push our changes.
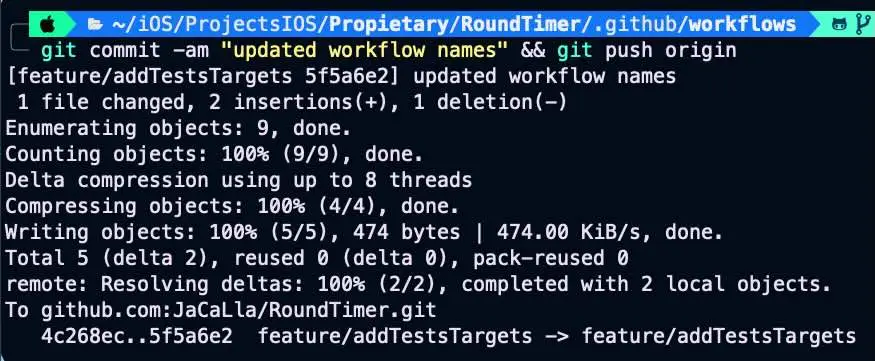
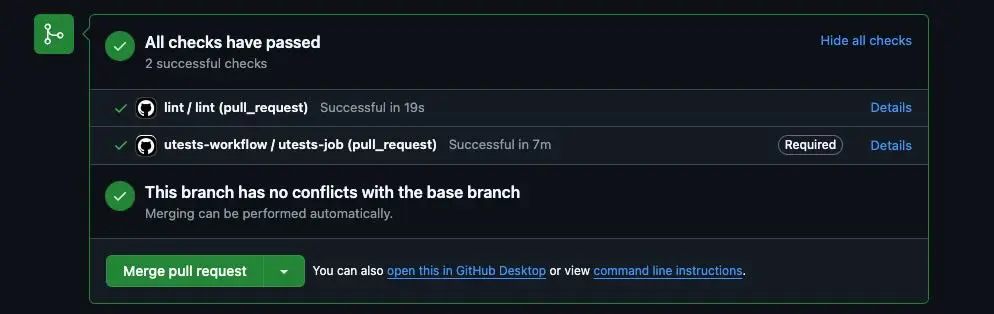
Create a pull request on GitHub for your project, and at the end, you should see that the workflow is being executed.

After few minutes…
I aim you to force fail some unit test and push changes. Did allow you to integrate branch?
Workflow for linting
We are going to create a second workflow to verify that static syntax analysis (linting) is correct. For this purpose, we have created the following .yml GitHub Action workflow script:
name: lint

# Especifica en qué ramas se ejecutará el workflow
on:
  pull_request:
    branches: [main, develop]
jobs:
  lint:
    runs-on: macos-latest
    steps:
      - name: Checkout code
        uses: actions/checkout@v4

      - name: Install SwiftLint
        run: brew install swiftlint

      - name: Run SwiftLint
        run: swiftlint
In this workflow, the name and job refer to the linting process, with the only differences being in the last two steps.
The first step, as in the previous workflow, is to check out the branch. The next step is to install SwiftLint via Homebrew, and the final step is to run SwiftLint. In this case, we will deliberately trigger a linting error.

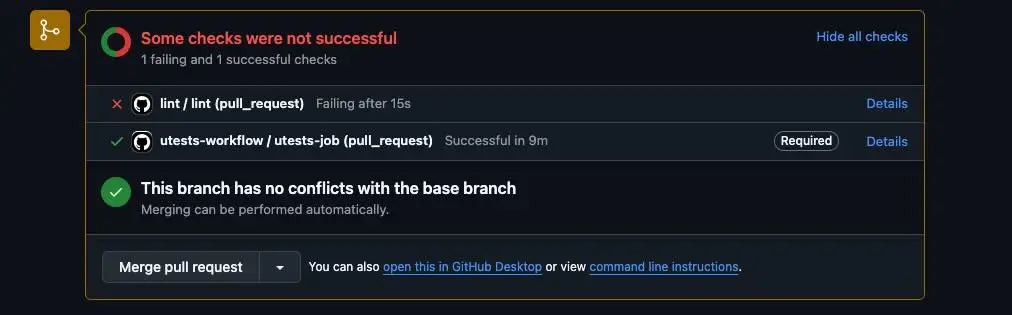
Once we commit and push the change, let’s proceed to review the pull request. The lint workflow has been executed, and a linting error has been triggered. However, it is still possible to merge the pull request, which is what we want to avoid. In the next section, we’ll address this issue.
Setup branch rules
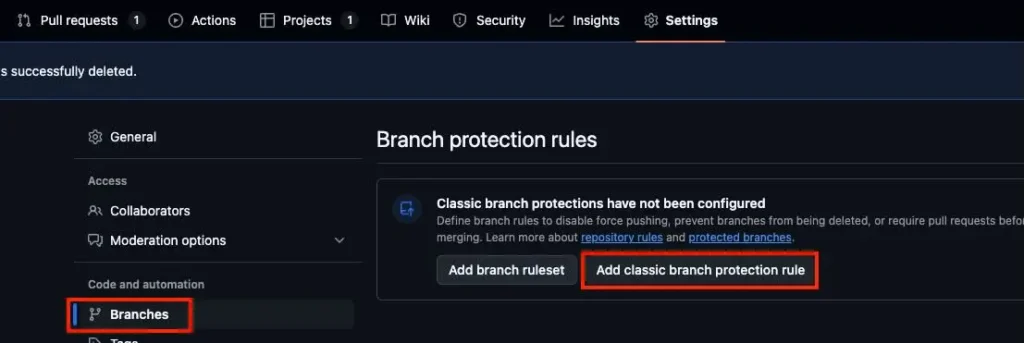
Now it’s time to block any merges on the develop branch. Go to your repository settings.

In the Branches section, click Add rule under Branch protection rules and select Add a classic branch protection rule.
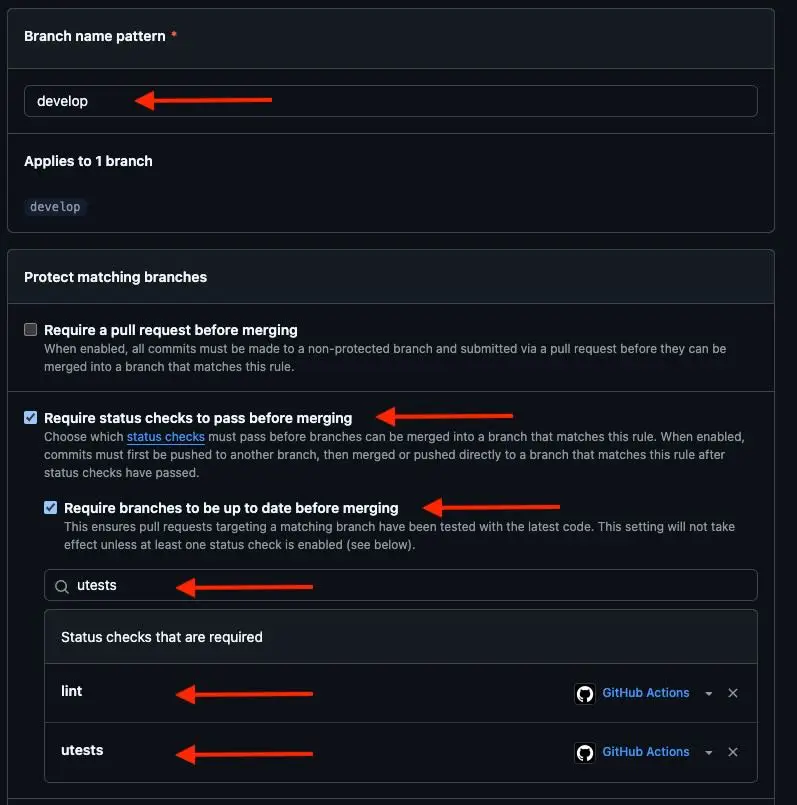
Enter the branch name where the rule applies. In this case, it is develop. Check “Require status checks to pass before merging” and “Require branch to be up to date before merging”. In the search box below, type the workflow name. In this case, we want the unit tests and linting to succeed before proceeding with the pull request.
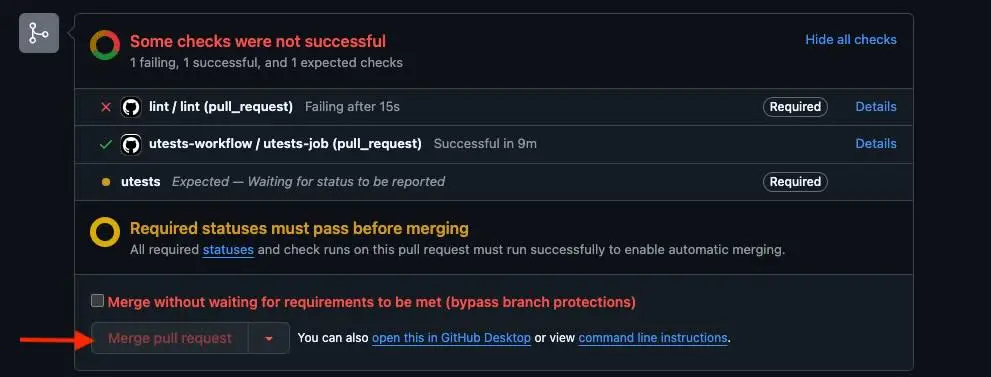
When we return to the pull request page (and possibly refresh), we will see that we are not allowed to merge. This was our goal: to block any pull request that does not meet the minimum quality requirements.
This rule has been applied to the development branch. I leave it to the reader to apply the same rule to the main branch.
Conclusions
By integrating GitHub Actions into our team development process, we can automate tasks that help us avoid increasing technical debt.
Related links
- xcodebild documentation
XCode command line tool
- swiftlint
GitHub download repository
- GitHub Actions
Documentation
- Workflow syntax for GitHub Actions
Documentation
- GitHub Actions
Library of actions for workflows
- GitHub Actions Marketplace
Library of actions for workflows